1


Hey Everyone,

I'm looking to get an air compressor for some work around the house. It would mostly be used for nail guns to replace siding and trim. However, I do want to be able to spray wall texture occasionally (The walls have been "fixed" in various spots and I'm probably going to redo entire walls. A couple of walls are so bad I think they just threw the sprayer in the room and ran away). I'm fine with going slow when spraying texture as long as I can still get a good result. The compressor I'm looking at is a 6 gallon @ 175 PSI, with 3.0 SCFM @ 90 PSI. This seems perfect for nail guns ( I think), but texture guns seem to consume 2-9 SCFM. Do you that will be fine for periodic use, or will it be maddening slow? My goal would be to texture and paint a roughly 10ft by 12ft room in a weekend. I'll be using a roller and brush for paint so that is not a concern.

Sorry if its a silly question, but when researching this stuff it's getting so hard to find non-ai generated website's that are just trying to sell shit.

2


The drill has lasted me almost 10 years at this point of light usage. I opened it for the first time to re-grease with some lithium grease, and noticed despite it saying brushed motor it sure looks like I'd need a Dremel to open this. Figured I'd ask if anyone has seen similar and if so, is there a trick to opening this when the the brushes wear out?

3


I have looked at software like Sweet Home 3D, OpenPlan3D, and various cloud-based services that cost money. As nice as they look, they each have severe limitations -- main the inability to create accurate measurements for walls. For example, Sweet Home 3D doesn't give enough precision to create a wall with a 9/16 fraction. OpenPlan3D the field is disabled.

I would like to be able to build a 2D floor plan, but also be able to convert it into a 3D model that I can then add furniture to for interior decorating. I would prefer open source, but would settle for simply free to use.

4


Any opinions on sharpen vs replace? Honda HRX 217.

5


Most exhibitors assume a hotel congress venue works like a standard trade show hall. It doesn't — and the differences routinely derail installation timelines and push budgets into emergency territory.

Hotel and congress venues across Spain operate under constraints that Fira Barcelona or IFEMA simply don't impose:

  • Strict load-in windows: Many venues only allow installation during off-peak hours to avoid disrupting hotel guests and parallel events
  • Ceiling height limits: A 4m booth designed for a traditional hall won't clear a hotel ballroom — knowing this before design sign-off saves weeks of rework
  • Floor protection mandates: Parquet, marble, and carpeted floors require certified padding and coverings — often the contractor's legal responsibility to provide
  • On-site power restrictions: External cabling is frequently prohibited; you're tied to the venue's grid and their licensed electricians, with all the scheduling that entails

Contractors who consistently succeed in this environment have built working relationships with venue coordinators in Madrid, Barcelona, Valencia, and Bilbao — they know the documentation, the loading dock schedules, and the local compliance requirements before they arrive on-site.

This is the operational intelligence that separates a smooth congress installation from an expensive nightmare — and it's exactly what Adam Expo Stand brings to hotel congress builds across Spain.

Full breakdown here: https://adamexpostand.com/exhibition-booth-production-and-construction-at-hotels-and-congress-in-spain/

#ExhibitionStands #ExhibitorTips #CongressVenues #BoothDesign #SpainEvents

6
Hi, New here! (lemmus.org)
submitted 5 months ago by to c/diy@lemmy.world


Hi there, I’m new here. We were told to explore Lemmy for a class project on online communities. Is this a good place to start asking questions?

7


I tried to look this up but everything seems to be related to exterior load bearing walls..

A month or so ago, we noticed a good amount of water coming through the concrete porch into our basement. This portion of the 1940's basement below the porch used to be a garage, and sometime in the 90's (according to dates on portions of the sheetrock) they put in a wall where the garage entry was to expand the living space. I don't think this was load bearing when they put in the wall.

It seems like this leak was happening in 2017 as well, since new sheetrock was added and they tried to fix it with spray foam (which is obviously not water tight and did not fix the problem).

Anyway, I ended up ripping off the sheetrock to see the damage. All four sides of the framed wall are at least partially rotted, with the top and bottom plates completely compromised on the corners. This means that I should probably replace the entire wall, which would be "easy" if it wasn't load bearing..

However, over time and possibly accelerated with water intrusion, the concrete above has a long, horizontal crack which may go through both sides. The crack doesn't line up perfectly on both sides, but it's definitely possible that it's cracked all the way through. If that's the case, it means that this wall has now become load bearing, possibly holding up a portion of the porch above.

My thinking is that I could get a jack post (or a bottle jack and 4x4 post), put it in the middle, and then build framing on both sides with pressure treated 2x6s. Then I could remove the jack, and attach blocking between the two portions of new framing.

The other, more expensive but safer option would include talking to a structural engineer. I got a quote from one, and he wanted $900 to come take a look. I can afford it, I suppose, although I'm worried that he'll end up telling me what I already know.

Pictures below. Note that this is concrete on all 4 sides, and that the drywall has now been removed from both sides.

Here's the wall: Wall with exposed studs, showing damage and concrete on all 4 sides

And here's the crack on one side: Horizontal crack in concrete above wall

8


My main issues are:

  • sourcing the hardware, likely will do a headless one if at all,
  • creating the mold,
  • work with the epoxy,
  • I'm not even playing that much on the guitar anymore.
9
submitted 7 months ago by to c/diy@lemmy.world


On Monday, my desktop monitor decided to die. I sent my computer to restart for updates and it just suddenly gave up the ghost. The power button/light would come up, flicker and turn off, come up, flicker and turn off. The screen itself never came on. Something was very obviously wrong. After a bit of troubleshooting to be sure it was the monitor, I realized that it was no longer working and a suspicious "burning electronics" smell my wife had smelled near my computer recently was probably related.

So, I did what any clueless person does, I searched DuckDuckGo for anything related. And that led me to this video While this wasn't my exact monitor, it was the right manufacturer and with the suspicious "burning electronics" smell, the idea that one or more capacitors had popped seemed possible.

Now, I'm not an electrician. I can solder kinda ok (usually without burning myself). I have a basic understanding of electronics and know enough that I can look at a board and identify some of the components and what they might do. However, at this point the monitor was dead. It was destined for the landfill and I figured, "why the hell not?" The only thing I would lose is some time and maybe I would learn something along the way. And if I did succeed, I'd save myself a couple hundred dollars, prevent more e-waste and just generally do something that made me feel cool. So, I pulled out my toolkit and cracked my monitor open.

Inside I found a setup pretty similar to what the video showed. Specifically, there is a circuit board which is pretty likely the power supply. And sitting in a neat line were three capacitors which were bulging on top. Looking at the traces, all three capacitor bridged the same traces and I'm guessing they work in parallel somehow. I suspect that I had lost one or more when my wife smelled the burning electronics and the last one popped when I did the reboot. The monitor usually cycles into standby and comes back when I reboot and I guess that it led to just enough strain on the capacitor(s) this time to take them out. A few minutes work with a soldering iron, a solder sucker and solder wick and I had all three out and the holes cleaned out, ready for replacements (yes, they were all through-hole style).

Even better, all three capacitors were rated for the exact same voltage and capacitance (680uf 10V). Easy, I'll just pop down to the nearest Radio Shack, grab a few and.... Oh ya, it's not 1999. Getting any sort of small electronics part is actually a bit tough. Well fine, I ordered a 10 pack off Amazon. And then waited for them to arrive. They came today and I sat down to see if I could fix my monitor.

Soldering the new capacitors in place was only a few minutes work. I even have a 3d-printed resistor bending tool to get the spacing and bends in the legs pretty nice. Which was good as I just could not find capacitors of the right rating which were also the same diameter. The ones I got were about 2mm smaller. Parts replaced, I re-assembled my monitor, hooked it back up and... Well, it powered up correctly and the power button/light stayed blue, but there was nothing on the display.

Well shoot, this seemed close, but something was wrong. And then I remembered hearing a "pop" sound while moving some of the control boards around. Maybe I had disconnected a cable by accident or maybe I just didn't reconnect something right, or maybe I just fucked the whole thing up. So, I cracked the case back open (lesson learned: test before reassembling completely). I pulled the control boards back out and sure enough there was a ribbon cable which was half way unseated. I pushed that back in, put the control boards back in place (but left the case open), connected the monitor to my computer and fired it up. Never have I been so happy to see the GRUB menu.

I powered off the monitor, unplugged the cables and closed the case back up. And here I am now, writing a Lemmy post about it, using that monitor. Something destined to be e-waste, saved with less than $10 in components, a bit of easy solder work, and a willingness to just try.

10


They all die at the very root, and I have the third one dying on me. Unrepairable due to it being cast into some plastic. All "cable-free" converters are passive only, and I have to buy these DACs from an online store, as the local electronics store now only carries super cheap wireless (about as cheap as a proper wired, but godawful of course) ones.

Since building a time machine that would bring me back in time to stop the publication of the art that inspired wireless earbuds (it was some cyborg anime girl listening to music on earbuds without wires, at least the super-thin and transparent smartphone is far away), I thought I'd add some proper cable strain relief to one of these converters.

11
Cold room flooring help (sh.itjust.works)
submitted 8 months ago by to c/diy@lemmy.world


Hey, I've got a cold room in my place that is concrete on all sides, I'm going to be framing it in and insulating and I don't really need any help there unless there's anything cold room specific I should know, however.

As you can see I have a floor that appears to be a stepped concrete pit, filled with quite a lot of dirt, and what I believe is probably a tie in to the sewage drain.

Can I just get rid of the dirt? The whole room spells like petrichor because of it.

Assuming the pit continues to step down, can I just build the floor over it regardless, and do I need to support the pipe in some way if the dirt is removed?

Or, if I'm completely off base please let me know what I should be doing.

Thanks

12


I went to put in an outlet with charging ports and found this monstrosity behind the wall plate. The box is filled with expanding foam, I'm guessing as some kind of support? Then painted all over. I scraped it all out, put in outlet spacers and its much better. I think there's foam around the box too, but I'm not gonna worry about that (yet).

Now I get to spend next weekend replacing all the outlets in the house just in case there's any more sketchy "fixes" 🫠

After cleaning and replacing: Cleaned and repaired outlet

13


cross-posted from: https://lemmy.zip/post/51305553

I've been wanting an F1-style steering wheel for sim racing for ages, but I didn't want to spend massive amounts of cash on a commercially-built steering wheel that could be great but had loads of features I didn't care about (especially LEDs and a screen) since I play in VR.

A colleague of mine, who is also into sim racing, built a steering wheel that was better than almost anything you can find from Fanatec/Moza/Thrustmaster/whatevs for around 500€.

So, of course, I decided to buy the same thing build it myself from scratch for the challenge and to save some money. Because I'm an idiot, I guess. I thought it would take me 2-3 weekends. It took 4 months. It's basically a wheel-shaped mechanical keyboard. It was the biggest non-essential project of my life. I learned a lot, including not getting myself delusional enough to start that kind of project on a whim.

Steering wheel's back

Features:

  • F1-shaped steering wheel, heavily inspired by Ferrari's one with the general shape and front. Back is closer to Mercedes'.
  • Magnetic shift paddles
  • Analog clutch (WIP)
  • 7 rotary encoders
  • 10 face buttons + 2 back buttons + 5 clickable encoders
  • Quick-release connection to the steering column
  • Aviator-style USB connector
  • QMK firmware
  • Everything is 3D-printed except for the aluminium mid-plate and the quick-release

If you guys are interested I have a few WIP pictures, so I could start a build log. WDYT?

Installed Front Installed Back

14
Knife safety repair (lemmy.world)
submitted 11 months ago by to c/diy@lemmy.world


I'm looking to repair the safety slide on this knife. There use to be a hemisphere type of thing on it similar to the button. Years ago it randomly fell off and I didn't notice so I lost it. Any ideas on a good repair? The knife holds sentimental value to me as it was my grandfather's and I believe he got it in West Germany when he was stationed there.

If anyone knows of any better communities to post to for help I'd love the recommendation!

15


I'm looking to finish the back of a cabinet cheaply while maintaining a wood look on it, it's to be a kitchen island with a butcher block top. The back of the cabinet is unfinished MDF.

I was thinking for simplicity I could use wood flooring pieces like this to finish it and just add corner trims, but wondering how I could glue it down to the back. Wood glue is probably out, but would liquid nails work?

16


Hi Lemmy,

I want to do a project that involves concrete. Basically I am making steps, giving them texture and stamping them so it looks somewhat like stones.

I have watched a million videos and I feel I can tackle this, plus I have a lot of areas to practice that won't be too visible so if the steps look a bit amateur it's fine.

My biggest question is about the effort of mixing concrete. I have a corded drill with a mixing paddle and most steps won't require much. However a few are larger and I would have to mix 10 bags or so. The drying time allows me to work one at a time and then do my stamping but I was wondering if this is feasible from an effort perspective.

I am an experienced DIYer but have not worked much with concrete, I made a coffee table, post bases, etc but never something that requires so many bags... am I setting myself up for failure / a broken back? hehehe

17


Is this a thing that I could legally do myself or is there no choice but to suck it up and commit to more than the life expectancy of the panels before roi? We got two quotes last summer that were just not happening mainly due to windows and roof both bedding replacement as well. The current concrete tile is likely to be replaced with a cheaper material.

18
submitted 1 year ago* (last edited 1 year ago) by to c/diy@lemmy.world


I’m trying to set up a quick-connect system for my natural gas crawfish boiler and could use some guidance. Here’s my setup:

  • Gas line on patio: 1/2" female threads
  • Boiler connection: 3/4" male threads

I want to use quick-connect fittings so I can easily detach the boiler and store it in the garage. My initial thought was:

  • A 1/2" male quick-connect for the gas line
  • A 3/4" female quick-connect for the boiler (though I recognize I might need an adapter)
  • A compatible hose to link them

But I’m struggling to find a straightforward kit or parts that match these sizes. Am I missing something? Are there adapters or specific brands that simplify this?

Edit: Thank you @hex123456 and @David_Eight! I got it figured out. In case anyone finds this for a similar setup, here is what I did:

19


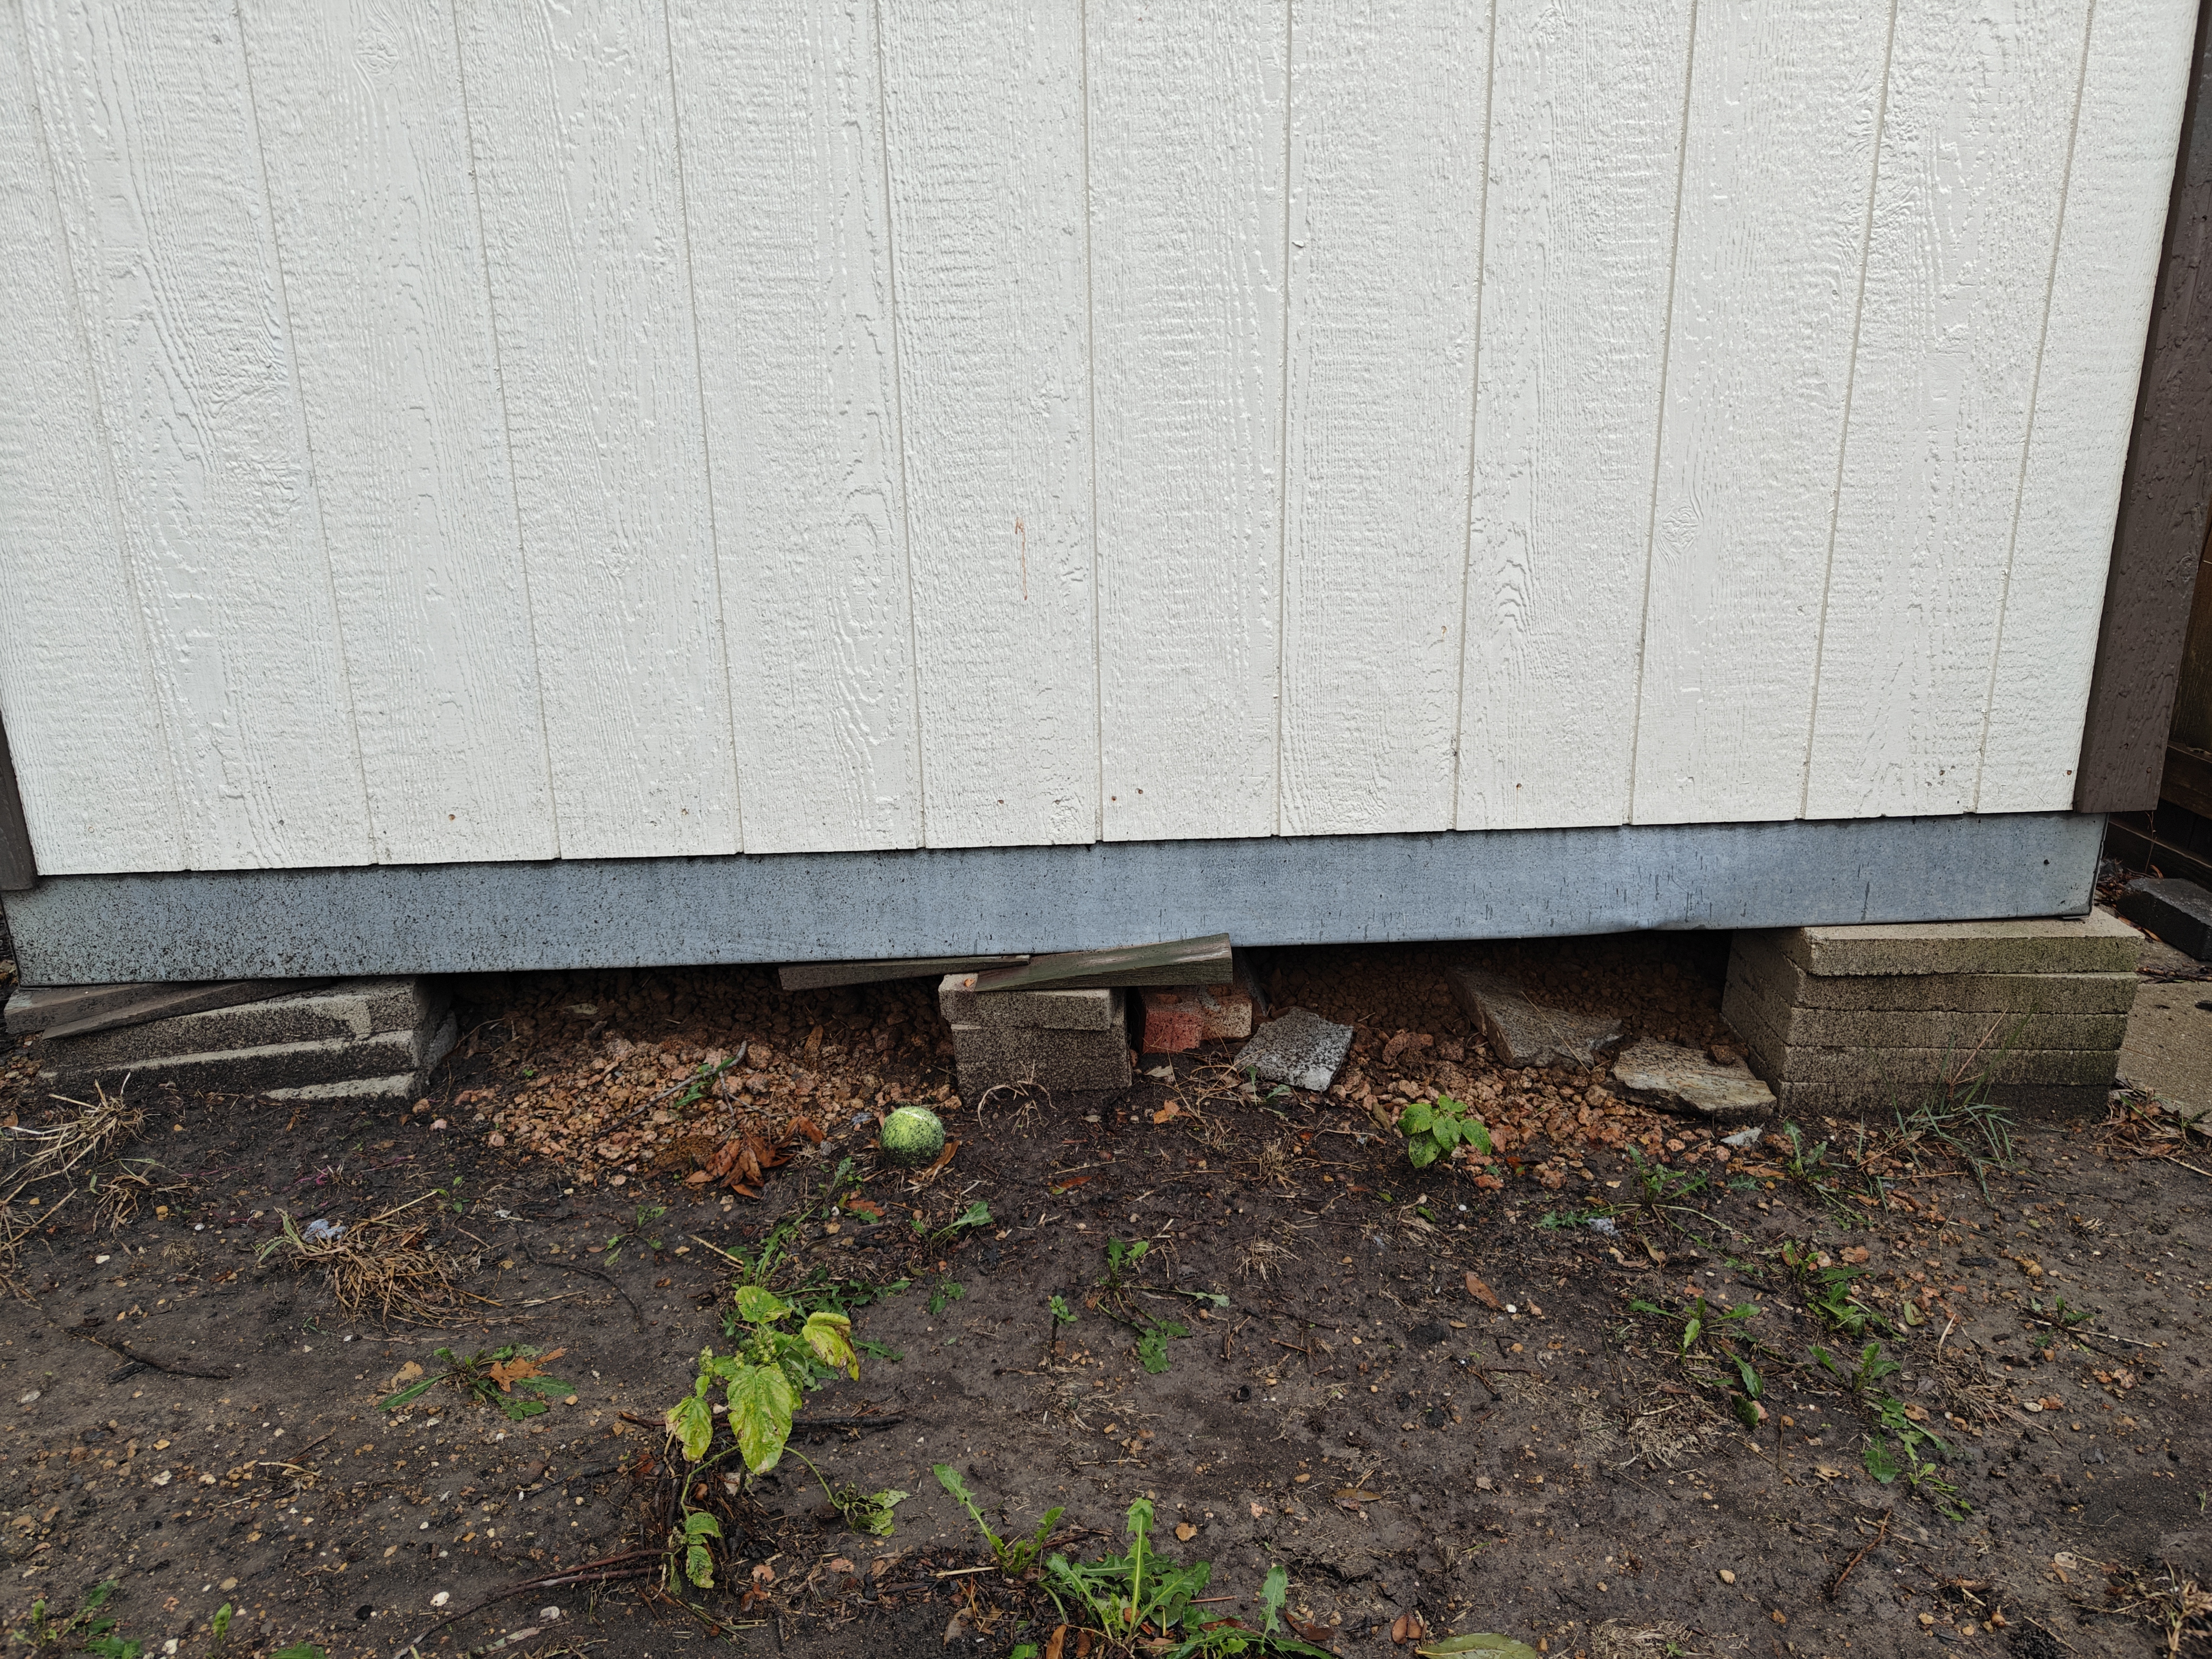
Not sure if anything is actually needed. It just looks unstable. Power is already run to the shed, so it might be difficult to move and do a full concrete pour. I was thinking of lifting with a car jack and finding a better combination of pavers to remove the wood wedges, but I'm open to any ideas. And it is on a slope, the other end is on pavers on the ground. This stack of pavers was the previous owners attempt at levelling I guess.

20
submitted 2 years ago by to c/diy@lemmy.world


I've spent a few days researching how to replace my air switch / timer box with something remote control. Water got in the air switch line and it hasn't worked right since. I've looked for replacement breakers, maybe some contactors with wifi etc. I don't need a timer function, just on and off for my spa pump and blower. I believe they each run on a 220v 20amp circuit. The pictures below are the old box with timer and air switch, and the breakers that precede that box, which I believe is a quad plex arrangement. I'm open to replacing the breakers or the box.

I'm a novice with this stuff so any guidance you have is appreciated in advance. I actually spoke with intermatic and their rep told me they don't have any single boxes that can control 2 220v circuits, which seems insane to me since the original is an intermatic product.

21


What are you.planning on DIYing this year? Large or small I'd love to hear about it. Is it something you've done before or something out of your comfort zone?

I'm planning on building some wheelie bin storagefor the from of the house that's on a bit of a slope. Never done anything like that before. I'm going to get a wood blade for my angle grinder as I cannot cut straight with a saw to save my life.

I'm sure it'll end up looking like Homer's handywork.

Before or after that I'd like to build a small work bench for the garage. But the possibilities are so much to decide on.

22
submitted 2 years ago* (last edited 2 years ago) by to c/diy@lemmy.world


Hello all,

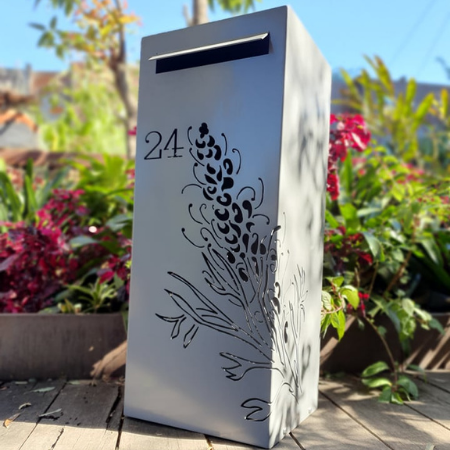
I have been tasked by the wife with putting up her new mailbox. It weighs in at a hefty 40 kgs. It came with a base plate with 4 holes to attach it to something on the bottom. I was going to make up a quick concrete slab but is a complete newb in that regard.

Please help;

Should I put some bolts in the concrete before it cures or should I drill the concrete after it's cured and put some bolts in then?

There is some existing concrete in the spot from the post of our previous mailbox, is it ok to just cover that over with the new concrete?

Will it be enough to just make a box shape with some scrap wood for the form or should I get something else? Being a 40 kg monster, how thick should I make the slab?

Any other advice?

Thank you in advance!

23


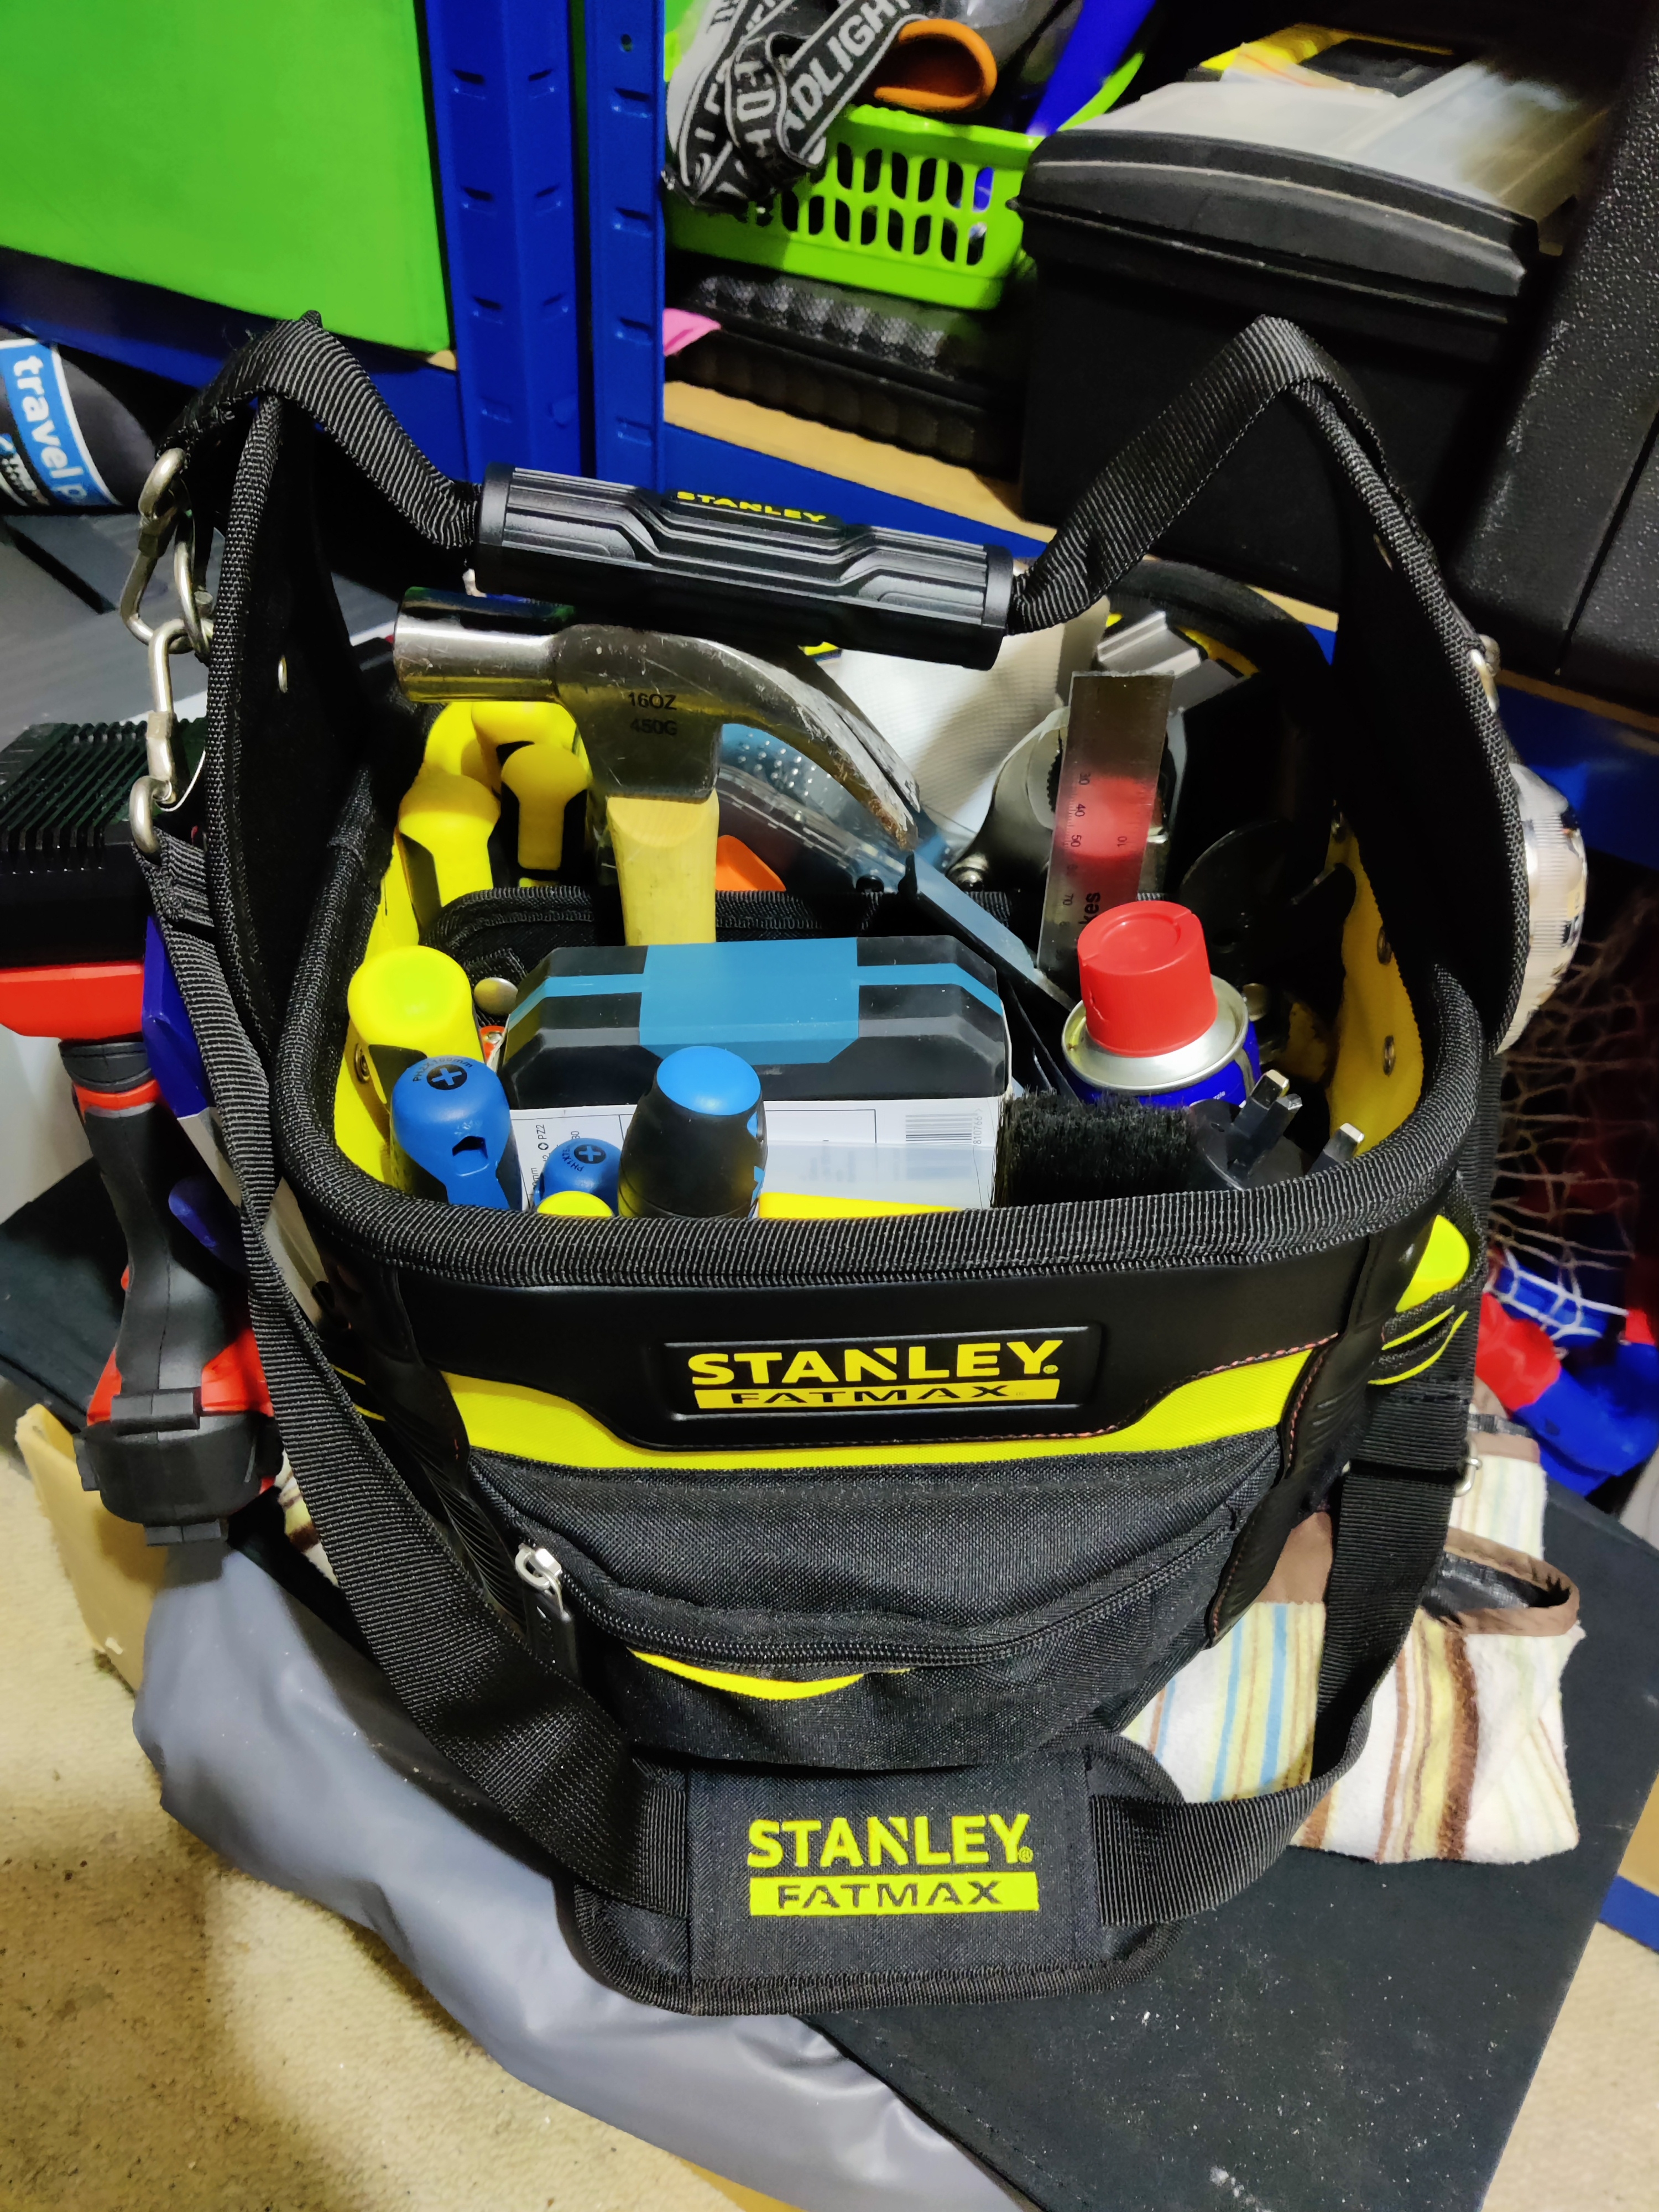
I've never had a proper tool bag before. As a home DIYer I've just had loose tools on shelves in the garage. I finally got fed up of running up and down stairs to get the next tool I needed on a job. This thing is great. I can fit most things in and I have a few other tools to add - like some scissors to stop borrowing the kitchen ones. I may even get a shorter, wider one for longer tools that are less frequently used.

Let's see your tool bags and setup.

24


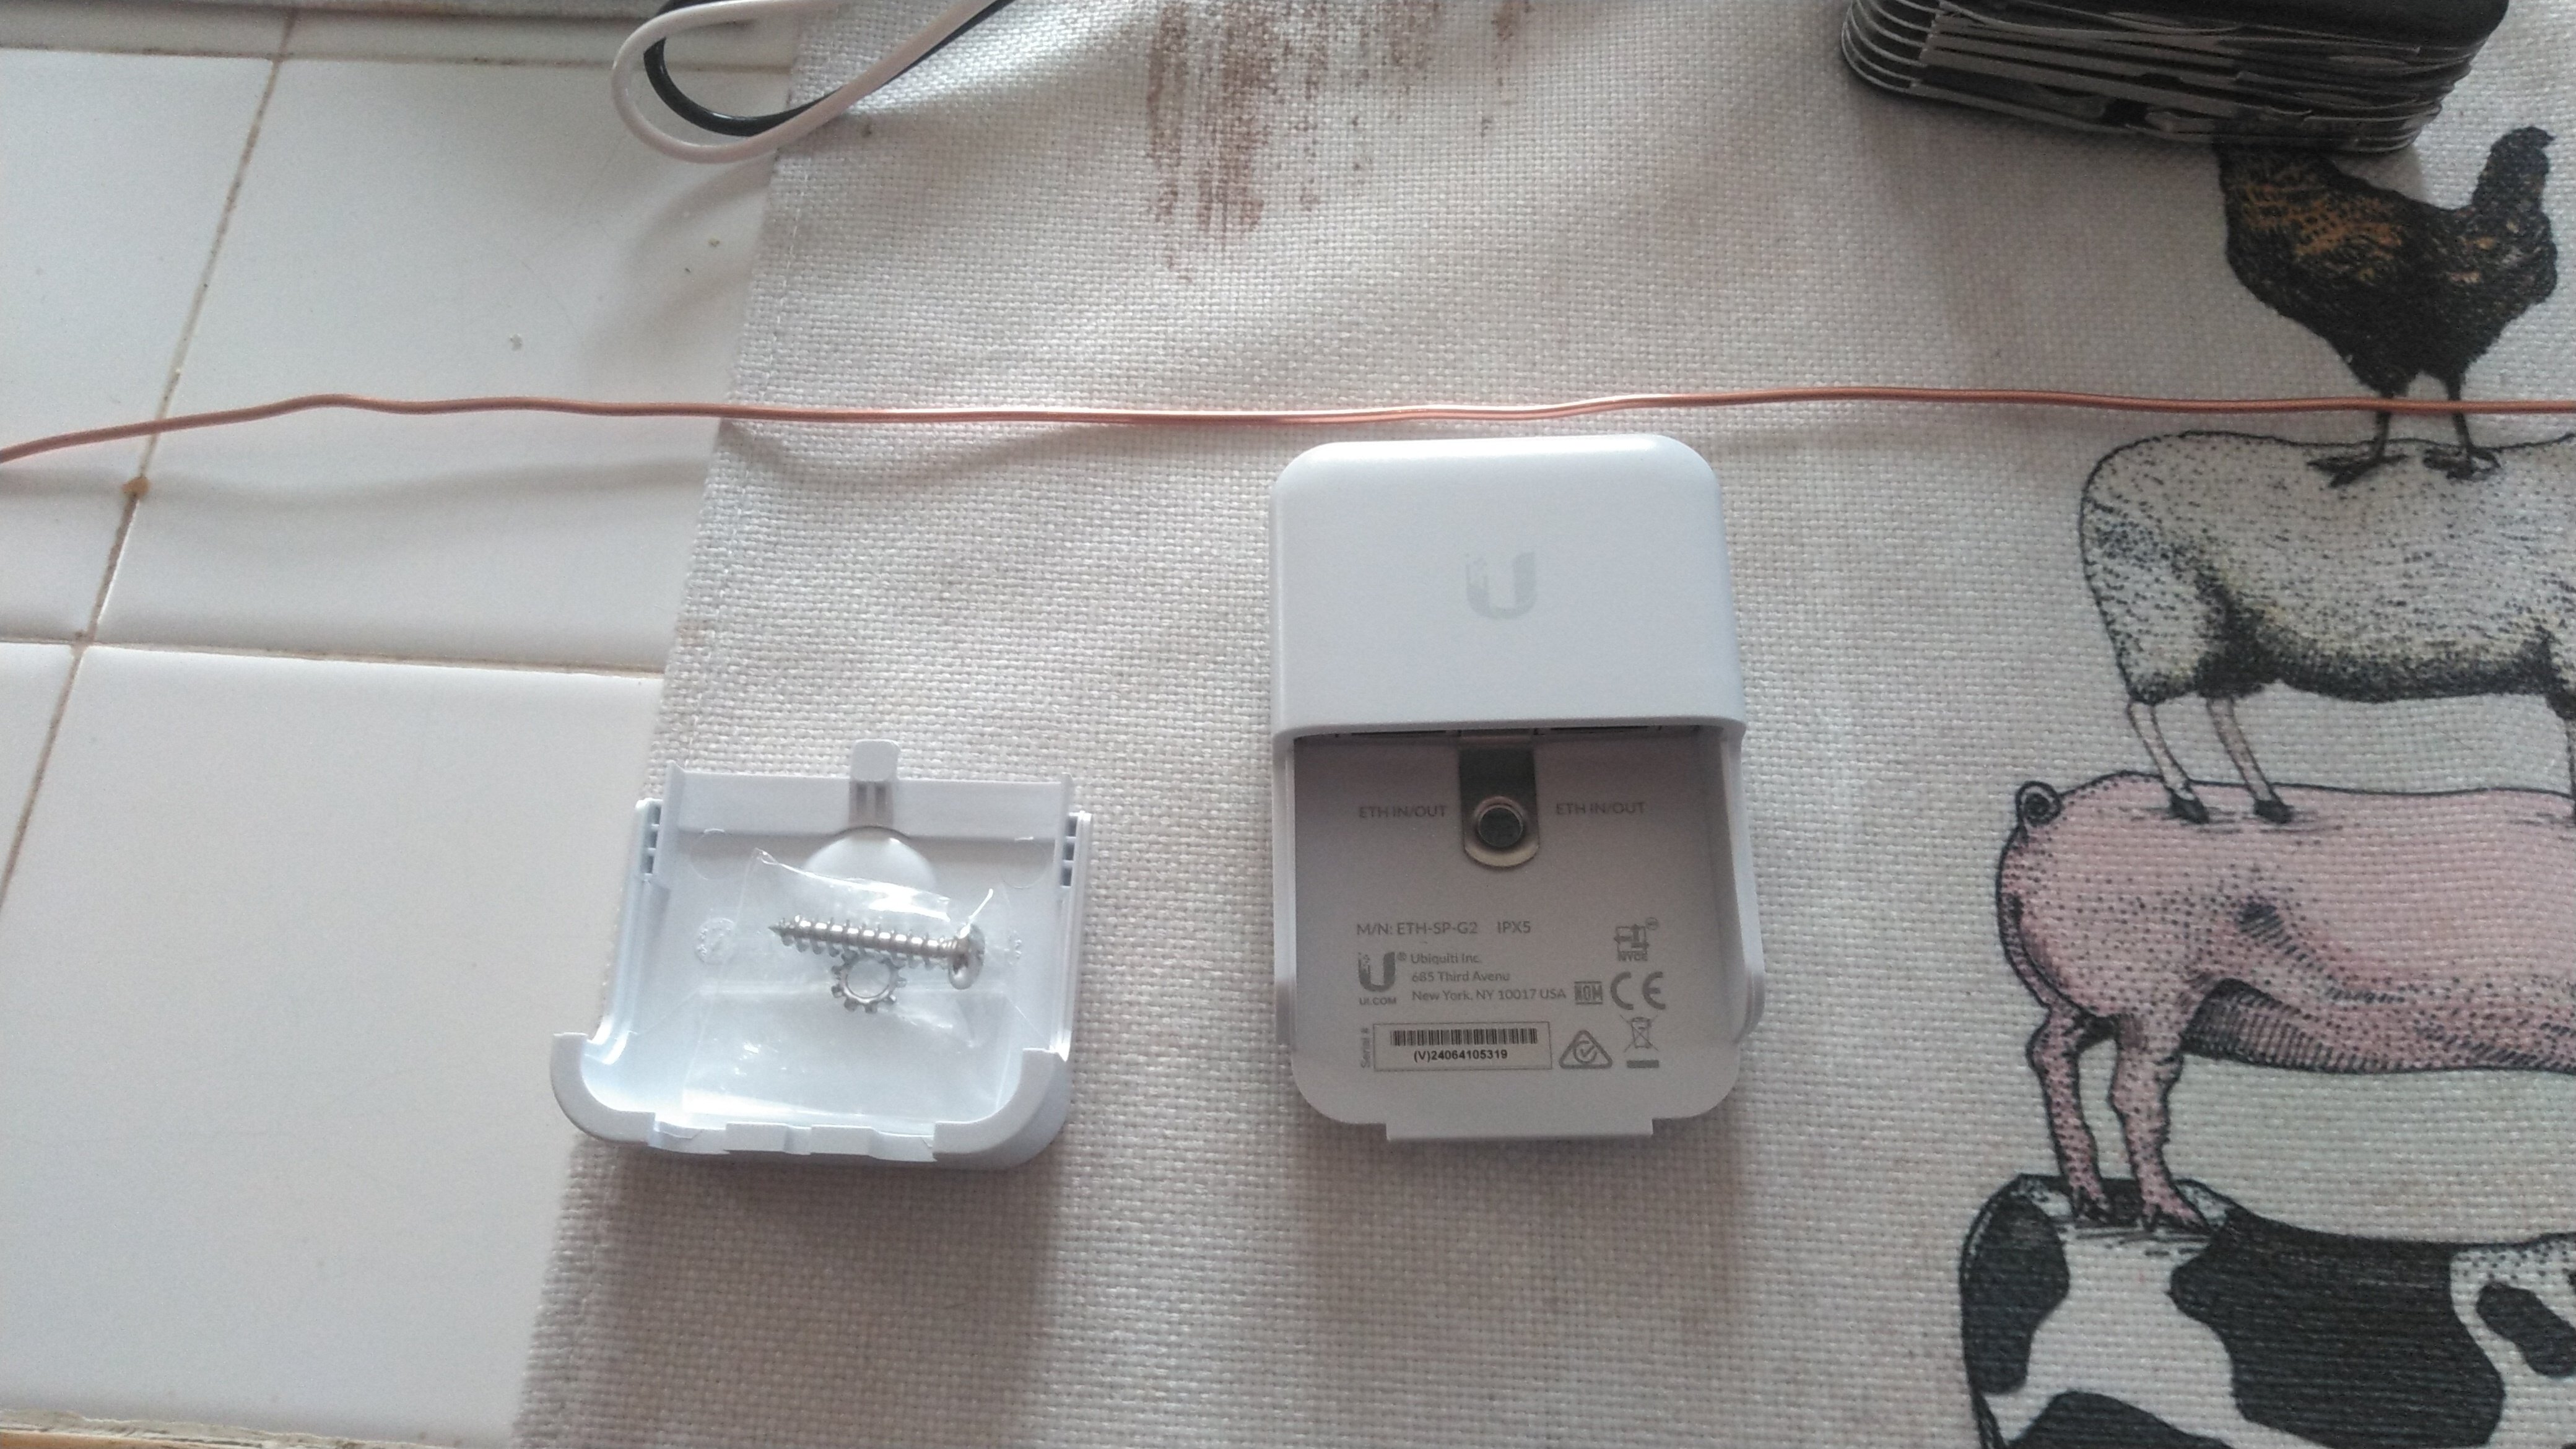
I have added a wifi repeater to the outside of my home so that my wife can watch her critter cams. It is a POE device that runs all the way back to my router.

Would like to install this surge protector but I'm getting conflicting information on grounding it. My installation is to the side of my house, not a metal pole.

Lowest effort options first, I can:

A. Place the protector inside near where the CAT5 enters the basement. Ground to a junction box that I installed that is grounded to the house panel and rod.

B. Ground internally to a water pipe or externally to the outdoor spigot.

C. Drive a ground rod where the cable exits the house and ground to it.

D. Repeat C and also bond to to the pre-existing home ground rod. (Least preferable option, rods would be on opposite corners of house.)

25


Over the next year or so, we're looking to replace our wood floors, all the base boards, all interior & exterior doors, and door trim. Since the wife and I both work full time, we're thinking we'd focus on one at a time, and do it slowly over a few weekends and evenings. Is there an order that would make things easier? Like do floors before baseboards or vice versa? Is it even worth doing things one at a time?

view more: next ›